How To Create A Workgroup
Authenticating users in a computer network.
Employees in any organization, big or small, need to log in to their computers at the start of their work day. Logging in gives them access to shared files, folders, printers, critical applications related to work, as well as the internet. Organizations need to authenticate and verify the identity of each user before they gain access to these resources—but how?
The method you use to authenticate and verify users depends on the type of computer network setup in your work environment.
There are two major types of network setups:
- Workgroup environment: This environment is usually found in small offices and home offices.
- Active Directory environment: Larger offices (usually with more than 15 unique users) use Active Directory.
Here we will look at what a workgroup is, how to set one up, and how authentication is managed in a workgroup.
What is a Windows workgroup?
According to Techopedia, a workgroup is a peer-to-peer network setup using Microsoft Windows operating system. It's a group of computers on a local area network that share common resources and responsibilities. You can easily create a workgroup by connecting two or more PCs without going through a separate server computer.
In a workgroup, each computer on the network is physically connected to a router or switch. Each computer that's a member of a workgroup can access shared resources in the network, like files or printers, or share their own resources with the group. While a workgroup is a group of computers that are connected to a network, it's not the same as a network. You can connect a computer to your network without making it a member of a specific workgroup. You can even have multiple workgroups in the same network.
How does a workgroup in a small office or home office work?
Let's take an example of a small three-person office. John, Amy, and Mark are this small office's three employees. Every computer on this network will have its own database of usernames and passwords.
Essentially, a workgroup is "every man for themselves," and there is no central control. Every PC in a workgroup is a server and a client at the same time. A PC will act as a client when it seeks to access a resource in another PC. The PC which needs to provide the access to its resources will act as a server during the process of authentication and authorization.
For instance, if Amy wants to use Mark's computer, her username and password need to be created on Mark's computer. And if Mark wants to use Amy's computer, his username and password need to be created on her computer. If both Amy and Mark want to use John's computer, both of their usernames and passwords need to be created on John's computer.
How to set up a Windows 10 workgroup?
Once you've set up your network in your small office, you can follow the steps below to connect all your devices to a single Windows workgroup:
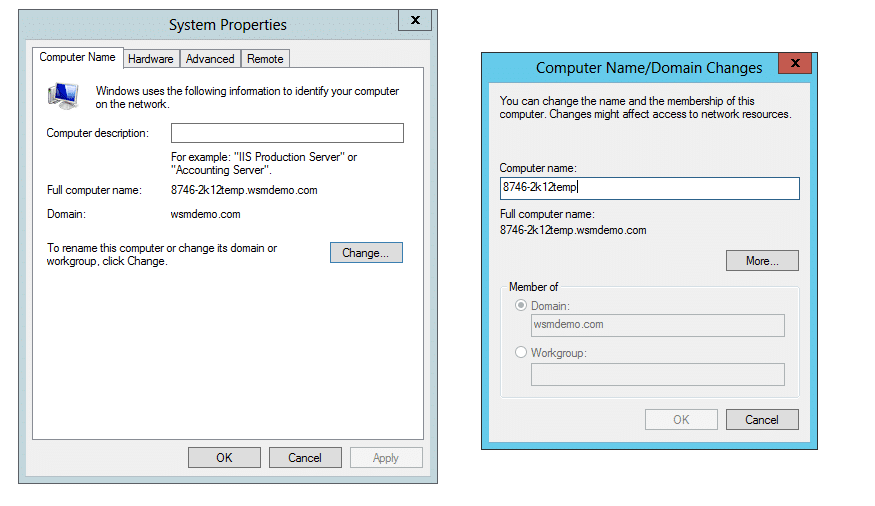
- Navigate to theControl Panel >All Control Panel Items >System. You will get to view basic information about your computer screen.
- Click onChange Settings under Computer name, domain, and workgroup settings to arrive at the System properties pop-up.
- Click onChange to rename this computer.
- Under the Computer Name/Domain Changes pop-up, you'll have the option to join the workgroup of your choice. Ensure that all the devices you want in a particular workgroup are joined to that workgroup. In this case, the workgroup is named My Workgroup. The following image shows where you can enter the name of the workgroup you want to join.

How do I share files and folders in a workgroup?
Now that you've set up a workgroup for your small office, let's talk about how to share files and folders among different users in a Windows 10 workgroup. Let's assume that you want to share the My Games folder under Documents.
Follow the steps below to share this folder:
- Right-clickMy Games.
- ClickProperties.
- Click theSharing tab.
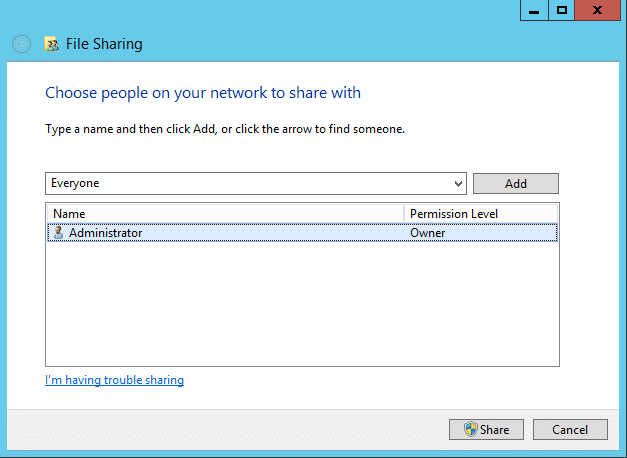
- Click onShare
- Choose the people you want to share the folder with, and select the permission level. The following image shows the screen where you can grant access to other users in the workgroup.
- While granting access to other users, you'll need to create their usernames and passwords on your own computer. This is the only way these users can be authenticated.

Workgroup challenges for large organizations and the need for Active Directory.
Workgroups are not suitable for larger work environments for two main reasons:
- They don't scale well: If the network is small, it's fairly easy to control a workgroup. However, imagine a scenario in which there are more than 15 computers. It would be time-consuming and tedious to create usernames and passwords by visiting each computer. Now imagine a corporation with more than 5,000 computers. It would be next to impossible to manage user accounts through a workgroup.
- Passwords do not sync automatically: If a user has changed their password on their own computer, the change won't be reflected in the other computers they may try to access on the network. When prompted to enter their username and password when trying to access other computers, they'll then need to input the old username and password to gain access.
Workgroups are great for smaller networks, but they aren't efficient for larger ones. For large networks, it's vital to keep all the usernames and passwords in sync with each other. To do this, you need a centralized database that manages all usernames and passwords, called Active Directory.
Note: A client PC cannot belong to a workgroup and a domain at the same time. If a client joins a domain, its workgroup membership will be automatically removed. The reverse is also true.
Workgroup vs domain
Workgroups are great for small office networks with 15 or less computers. However, they aren't ideal for larger companies with hundreds or thousands of users, as it will become difficult to access files and folders of one computer with another computer. Simply put, AD workgroups are fine for small offices, but they are not efficient in scaling to big organizations.
So, for big environments, we need to set up a client-server network environment. In Windows, this is achieved by setting up domains. The domain set up ensures better security as we can give varying degrees of permissions for different users or groups of users. Furthermore, we can deploy company-wide policies for easier administration in a domain than a workgroup.
How to change workgroup in Windows 10?
To change a workgroup in Windows 10 and make your computer a part of another workgroup, you can follow these steps:
- Right-click onStart, and click onSystem.
- Under Computer name, domain, and workgroup settings, selectChange Settings
- Under the Computer Name tab in the System Properties window, click on the Change button.
- Under the Member Of tab, change the Workgroup name to the new one.
- Click onOK to confirm your action.
- Reboot your device when prompted.
You computer should now be part of the new workgroup.
How To Create A Workgroup
Source: https://www.windows-active-directory.com/what-is-a-workgroup-and-how-is-it-set-up.html
Posted by: blackcomentse.blogspot.com

0 Response to "How To Create A Workgroup"
Post a Comment