How To Create Audio Cd From Mp3
How to burn MP3 to an Audio CD in Windows 10 (4 easy ways)
This tutorial will show you step by step how to burn MP3 files to an Audio CD in Windows 10. You will be able to play this CD on any CD player or car stereo.
MP3 and Audio CD
The MP3 audio format is a common audio format.
Because of their relatively small file size, you can burn many MP3 files to a single CD.
But not all CD players and car stereos can play MP3 files.
If your device doesn't support this audio format, then you will need to convert your MP3 music to audio CD format (CDA).
Windows Media Player is a media player that comes pre-installed in Windows 7, 8, and 10.
Tip: Use CD-R and not CD-RW, because not all CD players can play rewritable CDs properly – even when written in the correct audio format.
1. Insert a blank CD into the CD/DVD burner drive of your PC.
2. Open Windows Media Player.
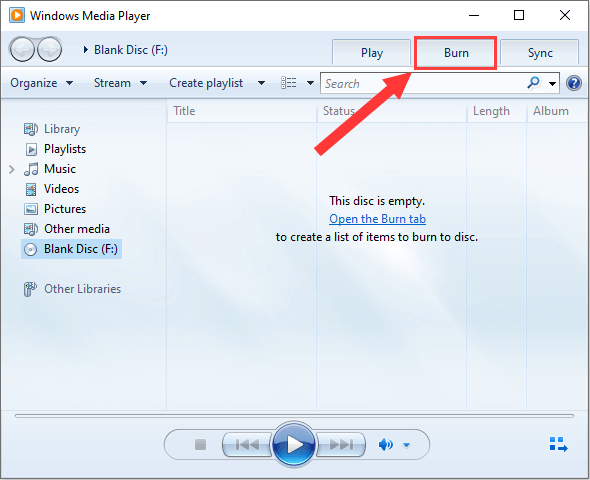
3. Click on the Burn tab located in the top right corner.
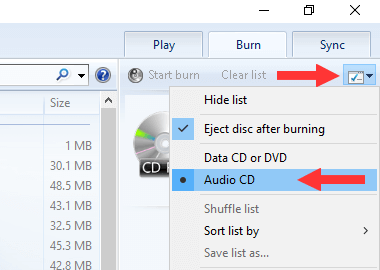
4. Click on the Burn options icon and make sure that Audio CD is selected.
5. Open Windows Explorer.
6. Go to the location on your PC where the songs are stored you want to burn to a CD.
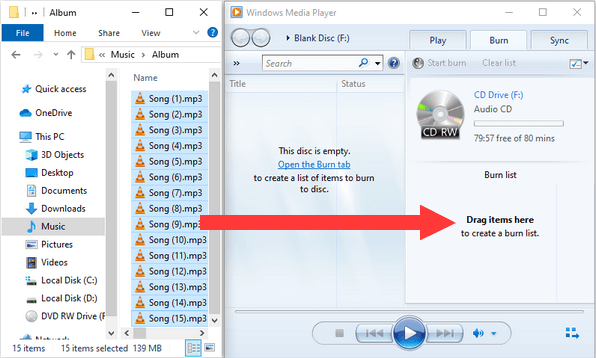
7. Make sure that the Windows Explorer window and Windows Media Player are both visible and located next to each other.
8. Drag the MP3 files from Windows Explorer to the burn list in Windows Media Player.
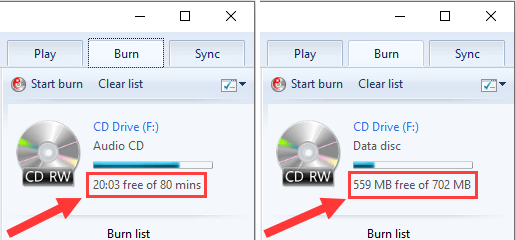
Note: The total time cannot exceed the capacity of your CD (usually 74 or 80 minutes).
Tip: You can view the time in minutes you have left on your CD at _:_ free of _ mins (e.g., 20:03 free of 80 mins) located just above the Burn list.
9. You can also reorder the songs in the "Burn" list by dragging and dropping the songs into the position of your choice.
10. When you're ready, you click on Start burn located above the Burn list and underneath the Play tab.
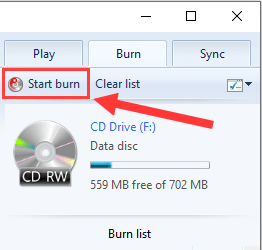
Windows Media Player will now convert your MP3 files to Audio CD format (CDA) and then burn them to your CD that can be played on any CD player or car stereo.
How to convert and burn MP3 files to an Audio CD using Ashampoo Burning Studio Free
Ashampoo Burning Studio Free is a free program for burning and copying CDs and DVDs and other disc-related tasks.
This program's user-friendly interface, menu, and step-by-step wizard will help you achieve your disc-related tasks, easily and quickly.
You can visit the product page for more information about the program and to download the program.
Visit product page
Tip: Use CD-R and not CD-RW, because not all CD players can play rewritable CDs properly – even when written in the correct audio format.
1. Insert a blank CD into the CD/DVD burner drive of your PC.
2. Open Ashampoo Burning Studio Free.
3. In the left menu, you go to Music and then choose Create Audio CD.
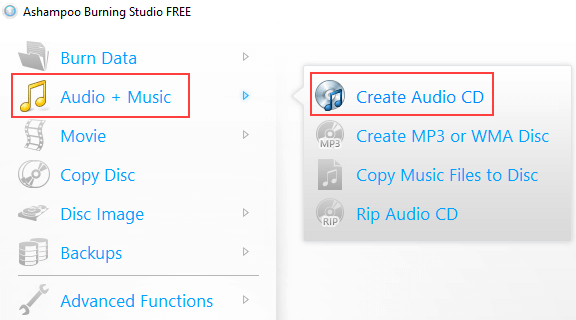
4. Click on the [+] button located in the top right corner.
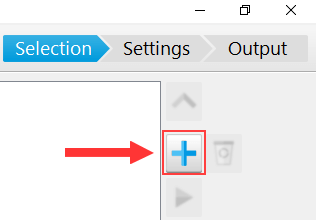
An "Add Tracks" window will appear.
5. Go to the location on your PC where the songs are stored you want to burn to a CD.
6. Select the songs.
7. Click on the Add button.
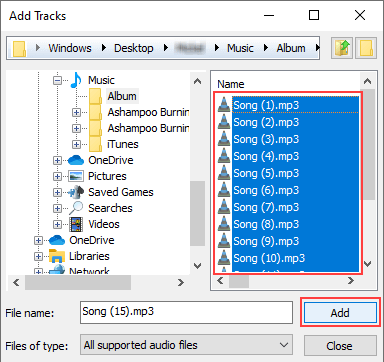
Note: The total time of the songs cannot exceed the capacity of your audio CD (usually 74 or 80 minutes).
Tip: You can view the time in minutes you have left on your CD at the Duration on Audio-CD bar located the bottom of Ashampoo Burning Studio Free.

8. Click on the Close button to close the "Add Tracks" window.
9. Click on the Next button located in the bottom right corner.
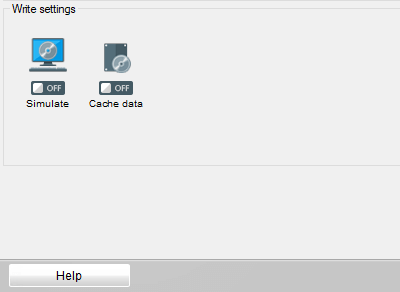
10. Now you will have the following optional "write" options in the bottom left corner:
- Simulate this simulate the recording before burning (this will double the time, use for testing)
- Cache data this will copy all data to hard disk image first (slower, but can prevent write errors)
11. In the bottom right corner, at Speed, you can select a burning speed. The maximum speed you can select depends on the capacity of the CD burner of your PC and the capacity of the CD.
12. You can also select the number of copies. This option is for people who want to burn more copies of the CD.
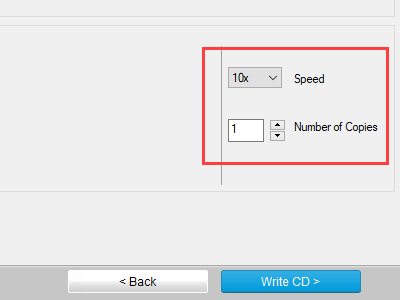
13. When you're ready, you click on the Write CD > button located in the bottom right corner.
Ashampoo Burning Studio will now convert and burn your MP3 files to an Audio CD that will play on any CD player or car stereo.
How to convert and burn MP3 files to an Audio CD using ImgBurn
ImgBurn website
Warning! This software may offer unnecessary software during its installation. So, pay attention during the installation and decline any offers.
Tip: Use CD-R and not CD-RW, because not all CD players can play rewritable CDs properly – even when written in the correct audio format.
1. Insert a blank CD into the CD/DVD burner drive of your PC.
2. Open ImgBurn.
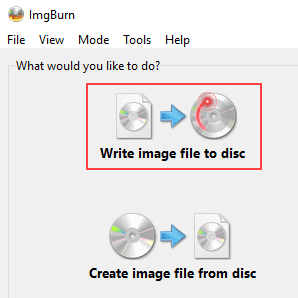
3. Click on Write image file to disc.
4. Click on Tools located in the top menu and choose Create CUE File.
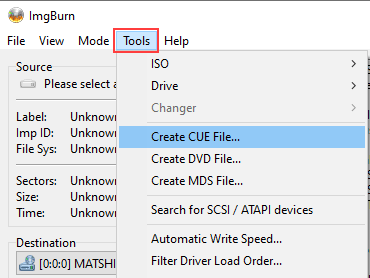
A "Create CUE File" window will appear.
5. Click on the folder icon located in the top right corner.
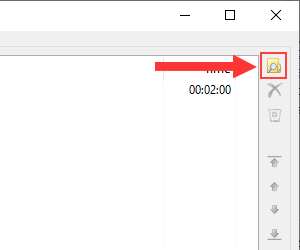
A "Open" window will appear.
6. Go to the location on your computer where the songs are stored you want to burn to a CD.
7. Select the songs.
8. Click on the Open button.
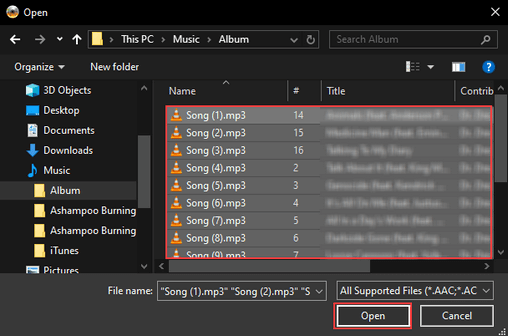
ImgBurn will analyze the files once you click on Open.
Note: The total time of the songs cannot exceed the capacity of your audio CD (usually 74 or 80 minutes).
Tip: You can view the percentage you have left on your CD at the bar located just below your songs.

9. When you're ready, you click on the OK button located in the bottom right corner.
A "Save as" window will appear.
10. At File name, you enter a name for your .cue file.
11. Select a location on your PC where you want to save the file.
12. Click on the Save button.
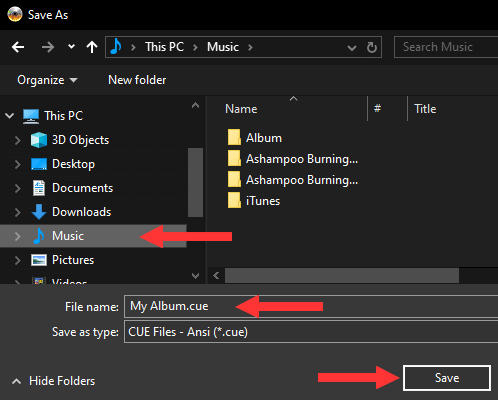
13. If a "CUE File Successfully Created!" window appears, you click on the OK button.
You should see your .cue file in the Source section.
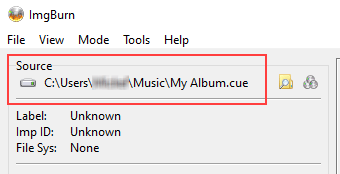
14. If you don't see the .cue file in the Source section, then click on the folder icon.
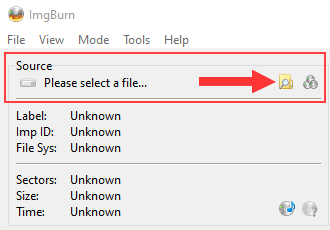
A "Open" window will appear.
15. Go to the location on your computer where the .cue file is stored that you created earlier.
16. Select the .cue file (e.g., My Album.cue).
17. Click on the Open button.
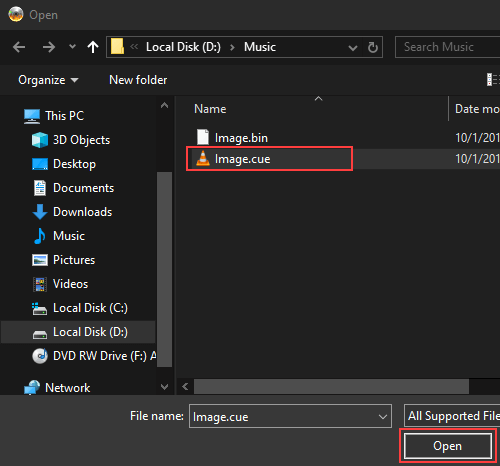
18. In the Destination section, you make sure that the CD burner drive of your PC is selected.
19. When you're ready, you click on the "file → disc" (write) button at the bottom of ImgBurn.
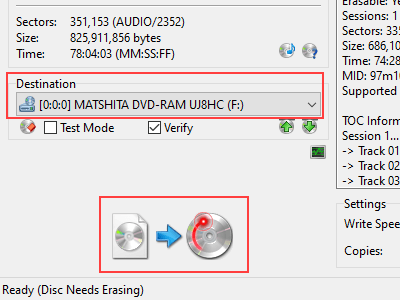
ImgBurn will now burn your Audio CD. This CD will play on any CD player or car stereo.
How to convert and burn MP3 files to an Audio CD using iTunes
iTunes website
Tip: Use CD-R and not CD-RW, because not all CD players can play rewritable CDs properly – even when written in the correct audio format.
1. Insert a blank CD into the CD/DVD burner drive of your PC.
2. Open iTunes.
3. Click on File located in the top left corner, go to New and click on Playlist.
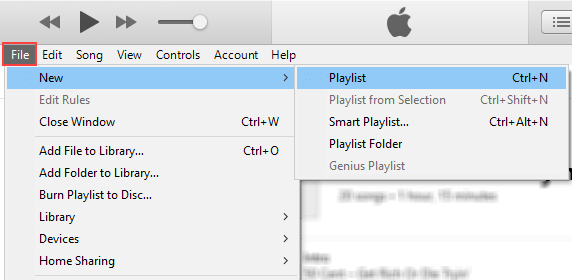
4. Enter a name for your new playlist.
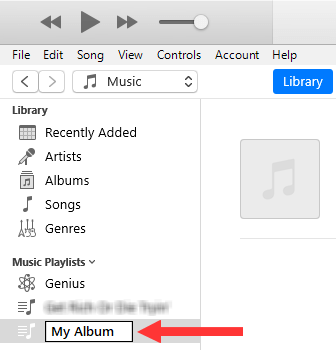
5. Add songs to your new playlist.
Four ways to add songs to your playlist:
- Drag the songs one by one to your playlist.
- Select multiple songs at once and drag them to your playlist. To select multiple songs at once, click on the first song, hold the [shift] key and click on the last song.
- If you want to add songs from an album, then click on Albums located in the left sidebar, click on the album that contains the songs you want to burn to CD, click on the round 3 dots button located next to the title of the album, go to Add to playlist and choose your playlist.
- Open Windows Explorer and minimize both the Windows Explorer window and the iTunes window, so that you will see both of them located next to each other, then go via Windows Explorer to the location on your computer where the songs are stored you want to burn to CD and drag the songs from Windows Explorer to your playlist in iTunes.
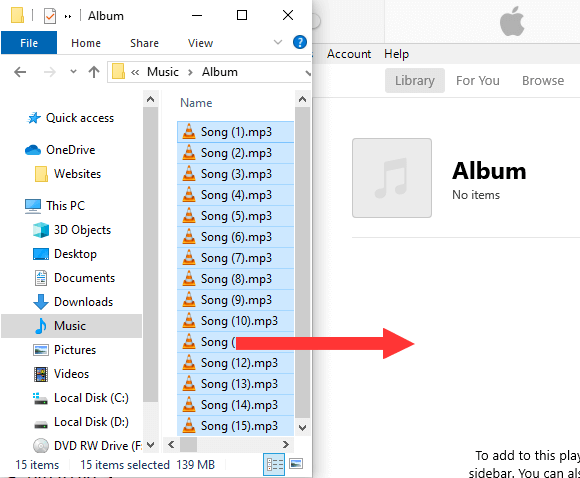
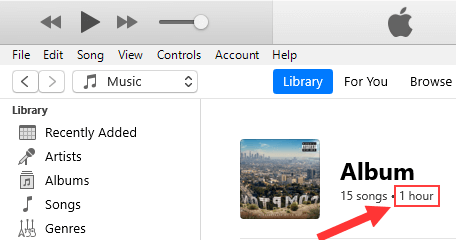
Note: The total time of the songs cannot exceed the capacity of your audio CD (usually 74 or 80 minutes).
Tip: You can view the total time (in minutes) of your playlist at the title of your playlist.
6. When you're ready, you right-click on your playlist and choose Burn Playlist to Disc.
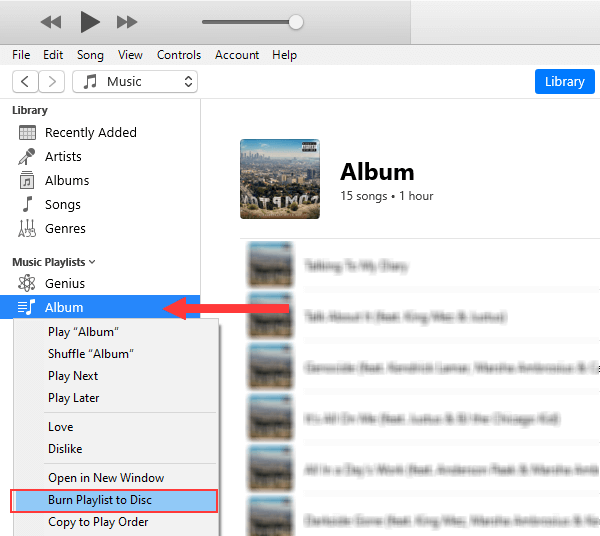
Or you click on the (...) button located at the top right of the playlist, and then click on Burn Playlist to Disc.
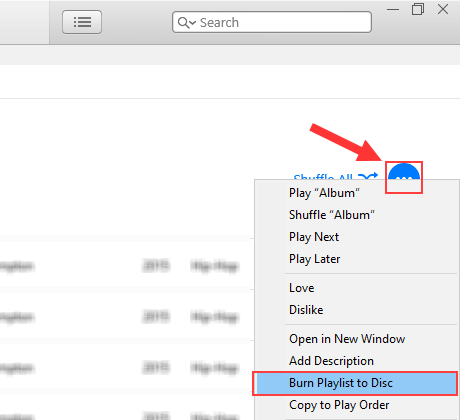
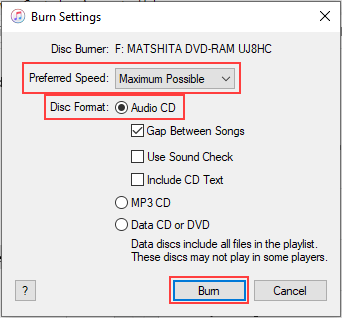
A "Burn Settings" window will appear.
7. At Preferred Speed, you can choose a burning speed. The maximum speed you can select depends on the capacity of the CD burner of your PC and the capacity of the CD.
8. At Disc Format, you make sure that Audio CD is selected.
9. You can also select a gap (pause) between songs.
10. Click on the Burn button.
iTunes will now convert your MP3 files to Audio CD format (CDA) and then burn them to your CD that can be played on any CD player or car stereo.
Maybe you're also interested in:
How to burn an MP3 CD in Windows 10
How to burn a CD or DVD in Windows 10
How To Create Audio Cd From Mp3
Source: https://www.easytechguides.com/burn-mp3-to-an-audio-cd/
Posted by: blackcomentse.blogspot.com

0 Response to "How To Create Audio Cd From Mp3"
Post a Comment