

How To Create User Registration Form In Wordpress Without Plugin
Want to create a clutter-free, multi step form in WordPress that looks great and converts well?
Splitting a form into multiple pages helps increase engagement and improve the user experience, all while fighting form fatigue so you get more form conversions.
In this article, we'll show you how to create a multi step form in WordPress.
Create A Multi Step WordPress Form Now
Here's a table of contents of the steps if you'd like to jump ahead:
- [VIDEO] How To Create a Multi Step Form in WordPress
- Create a Multi Step Form in WordPress
- Split Your Form into Different Parts
- Customize the Progress Bar
- Configure Your Multi Step Form Settings
- Configure Your Form's Notifications
- Customize Your Form's Confirmations
- Add Your Multi Step Form to Your Website
Why Use a Multi Step Form on Your Website?
Multi step form, as the name says, is a type of long-form that is divided into multiple pages and gives flexibility to users to complete the form in multiple steps.
WPForms is the best WordPress Form Builder plugin. Get it for free!
And, despite adding more steps to your WordPress form, using a multi step (also known as multi-part or multi-page) form on your WordPress website can actually increase your site's form conversion rate, especially if the form has more than 3 form fields.
In fact, after splitting what was once a single-step landing page form in WordPress into multiple steps, WhatIsMyComfortZone.com actually saw that 53% of site visitors converted and became leads, even when the form was broken into many steps.

And, since they asked the same questions on each form, it made sense that from then on, all long forms would be turned into multi step forms on their website.
Here are some more reasons to consider creating a multi step form in WordPress:
- Encourage focus: By grouping form questions, you can break down information into areas of focus for the user.
- Reduce form abandonment: Users will be more likely to complete the information you are requesting when it's broken down into pages rather than presented as one long form.
- Collect only what you need: You can have a WordPress multi step form with conditional fields using Conditional Logic. Show different pages of the form based on which answers users provide.
So, let's take a look at how to create a multi step form in WordPress.
How To Create a Multi Step Form in WordPress
If you're looking for an Elementor multi step form, read this tutorial and check out how to add an Elementor form to WPForms.
Check out the above video if you're asking yourself how do you create a multi step form with a plugin? If you prefer written instructions, continue reading below.
And if you're looking for the best free contact form plugin, be sure to check out our post comparing WPForms Lite vs Contact Form 7.
Step 1: Create a Multi Step Form in WordPress
The first thing you'll need to do is install and activate the WPForms plugin. For more details on how to set up this form builder, see this step by step guide on how to install a plugin in WordPress.
Next, go to WPForms » Add New to create a new form.
You can break any form into multiple parts or steps using WPForms. So, for our example, we'll create a simple contact form.
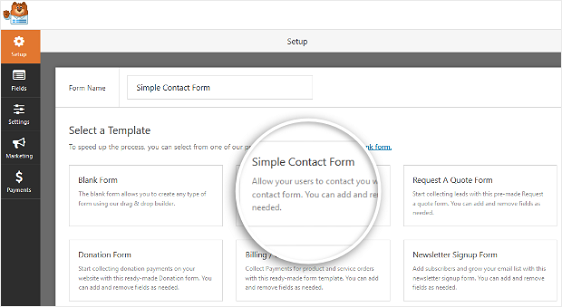
On the setup screen, name your form and select the template you want to use, depending on the type of form you're creating. We'll choose the Simple Contact Form template.
WPForms will create a simple contact form in the drag and drop builder.

From this form builder area, you can add additional fields to your contact form by dragging them from the left hand panel to the right hand panel.
With the simple contact form template, you'll already have the Name, Email, and Comment or Message form fields.
Click on any of the form fields to make changes. You can also click on a form field and drag it to rearrange the order on your contact form.
If you want to create something more complex than a simple contact form, take a look at some of the other tutorials we have using pre-designed templates that come with WPForms:
- Request a quote form
- Job application form
- Order form
- Survey form
- Poll form
- User registration form
These forms tend to be much longer than a simple contact form and will likely require multiple steps to complete if you ask for a lot of information.
Now let's take a look at how to split your form into multiple parts.
Step 2: Split Your Form into Different Parts
Once you've added and customized all the form fields on your form, you need to add the Page Break form field to your site to split it into different pages.
To do this, drag the Page Break form field, found under Fancy Fields, from the left hand panel to the right hand panel.
Place the field where you want the form to split.
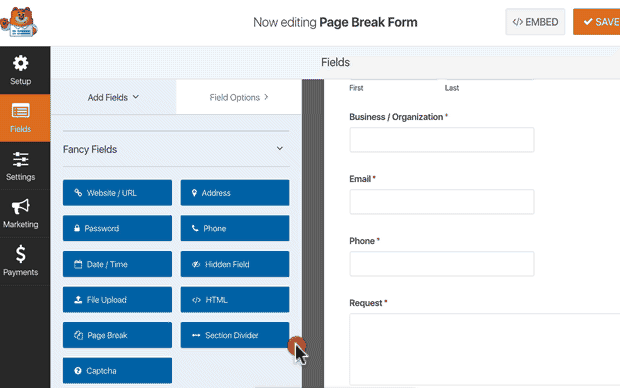
Do this everywhere you want your form to split into another page. From there, you can add additional form fields to complete your form.
WPForms allows you to create as many form pages as you want, but remember not to overwhelm your users. Only collect the information you need. You can always gather more information later.
Step 3: Customize the Multi Page Form Progress Bar
Based on your needs, you might want to show a progress indicator to let users know about the different sections of your form. This way they always know where they're at on your form and how much they have left to fill out before clicking "Submit" based on progress bars.
To make things super easy on you, WPForms comes with three different breadcrumb style indicator bars for your multi step forms:
- Connectors: shows a connecting bar and page titles of each part of your multi step form.
- Circles: shows one circle and page title per page on your multi step form.
- Progress Bar: indicates the progress of the form as the user fills it out.

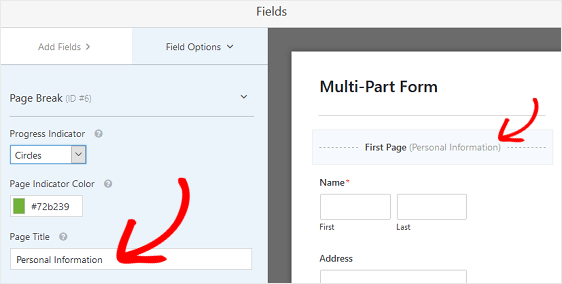
To customize the progress bar and page title of the first page of your multi step form, click on the First Page break section.
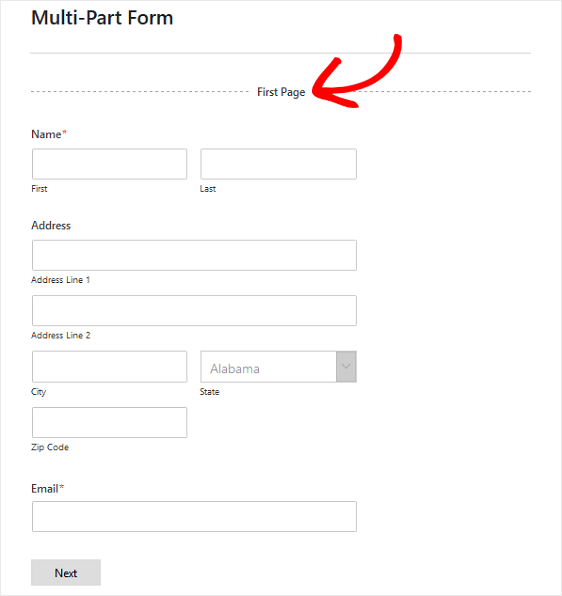
A new panel will appear in the Form Editor where you can choose which progress bar you want to use. You can change the progress indicator's color here too.
You can also change the page title so users know which part of the form they're on if you choose the Circles or Connectors option. Otherwise, users will just see a standard progress bar guiding them through the number of steps left on the multi step form.
To customize the next page title and the button taking site visitors to the next page on your form, click on the Page Break section you created when you added the page break to your form.
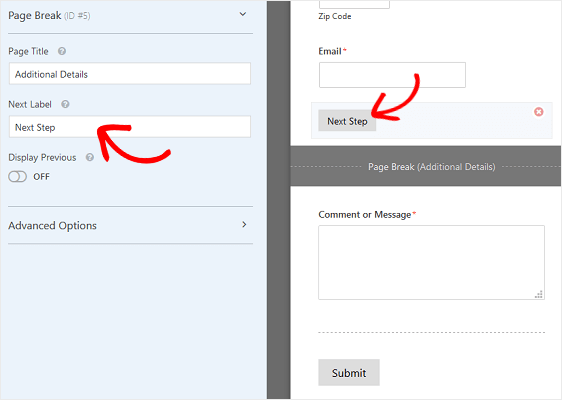
You can also toggle on the feature that lets you show site visitors a Previous page button. This way they can return to the previous page of your form if they need to.
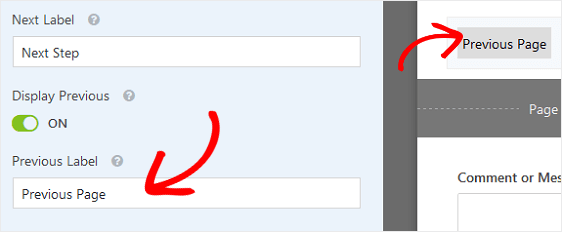
When you do this, you'll have the chance to change the button copy too.
Once you're done creating all of your page breaks and customizing the progress indicator, click Save.
Step 4: Configure Your Multi Step Form Settings
To start, go to Settings » General.
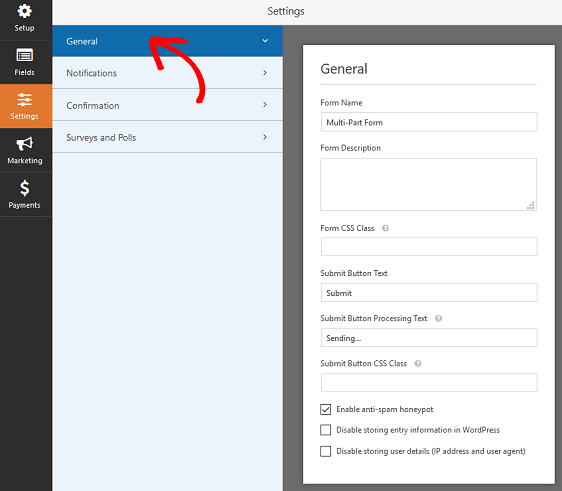
Here you can configure the following:
- Form Name— Change the name of your form here if you'd like.
- Form Description — Give your form a description.
- Submit Button Text — Customize the copy on the submit button.
- Spam Prevention — Stop contact form spam with the anti-spam feature, hCaptcha, or Google reCAPTCHA. The anti-spam checkbox is automatically enabled on all new forms.
- AJAX Forms — Enable AJAX settings with no page reload so you can have an AJAX multi step form in WordPress.
- GDPR Enhancements — You can disable the storing of entry information and user details, such as IP addresses and user agents, in an effort to comply with GDPR requirements. Check out our step-by-step instructions on how to add a GDPR agreement field to your simple contact form.
When you're done, click Save.
Step 5: Configure Your Form's Notifications
Notifications are a great way to send an email whenever a form is submitted on your website.
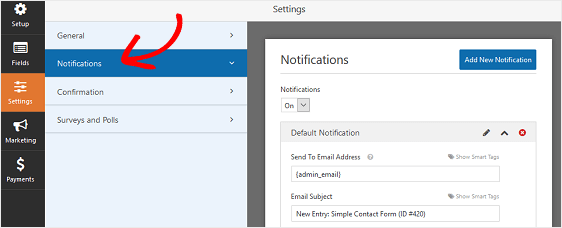
In fact, unless you disable this feature, whenever someone submits a multi step form on your site, you'll get a notification about the submission.
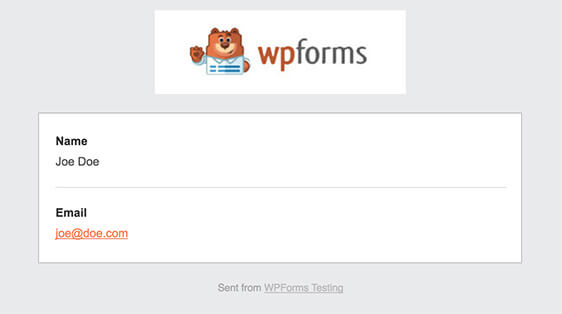
If you use Smart Tags, you can also send a notification to the user's email address when they submit a form, letting them know you received it and will be in contact shortly. This assures site visitors their form has gone through properly.
It's also appreciated when it comes to multi-page forms that may have taken a long time to fill out. The last thing a site visitor want to wonder is if the long form they just filled out went through.
For help with this step, check out our documentation on how to set up form notifications in WordPress.
Adding to this, if you want to keep branding across your emails consistent, check out this guide on adding a custom header to your email template.
Step 6: Customize Your Form's Confirmations
Form confirmations are messages that display to site visitors once they submit a form on your website. They let people know that their form has been processed and offer you the chance to let them know what the next steps are.
Again, this is helpful especially when it comes to long forms on your website.
WPForms has three confirmation types to choose from:
- Message. This is the default confirmation type in WPForms. When a site visitor submits a form, a simple message confirmation will appear letting them know their form was processed. Look here for some great success messages to help boost customer happiness.
- Show Page. This confirmation type will take site visitors to a specific web page on your site thanking them for their form submission. For help doing this, check out our tutorial on redirecting customers to a thank you page. In addition, be sure to check out our article on creating effective Thank You pages for boosting customer loyalty.
- Go to URL (Redirect). This option is used when you want to send site visitors to a different website.
Let's see how to set up a simple form confirmation in WPForms so you can customize the message site visitors will see when they submit a form on your site.
To start, click on the Confirmation tab in the Form Editor under Settings.
Next, select the type of confirmation type you'd like to create. For this example, we'll select Message.
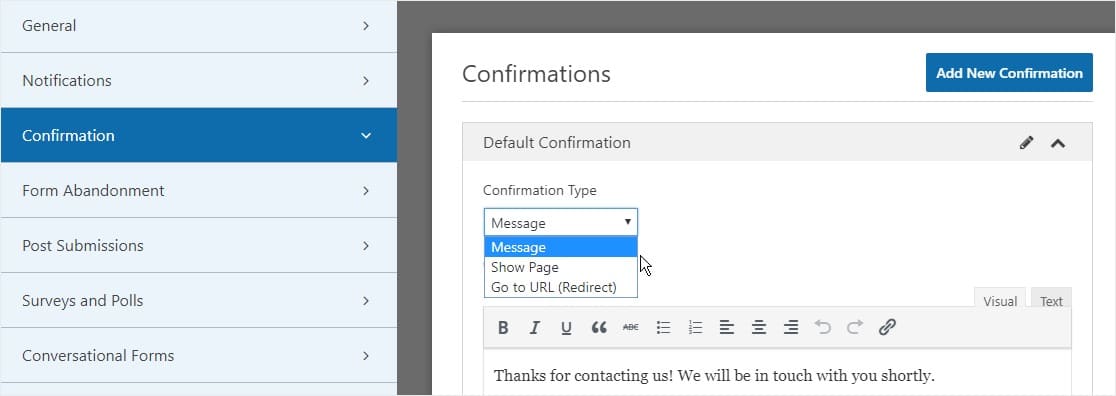
Then, customize the confirmation message to your liking and click Save.
For help with other confirmation types, see out documentation on setting up form confirmations.
Now you're ready to add your contact form to your website.
Step 7: Add Your Multi Step Form to Your WordPress Website
After you've created your multi step form, you need to add it to your WordPress website.
WPForms lets you add your forms to multiple places on your website including your pages, blog posts, and sidebar widgets.
Let's take a look at the most common placement option: page/post embedding.
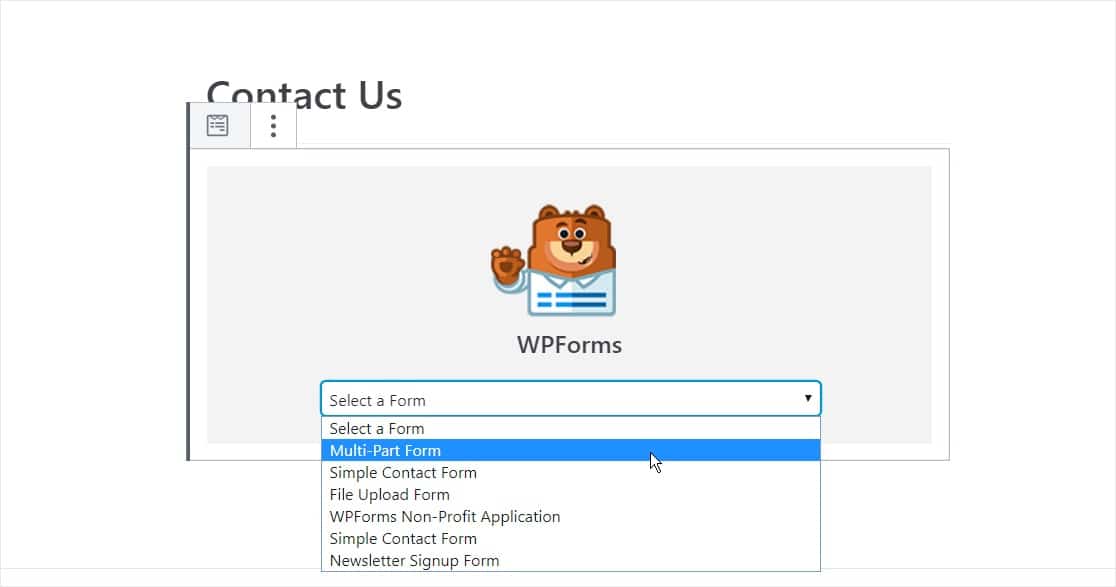
To begin, create a new page or post in WordPress, or go to the update settings on an existing one. After that, click inside the first block (the blank area below your page title) and click on the Add WPForms icon.
![]()
The WPForms widget will appear inside of your block. Click on the WPForms dropdown and pick which one of the forms you've already created that you want to insert into your page. Select the form you just created.
Then, publish your post or page so your contact form will appear on your website.
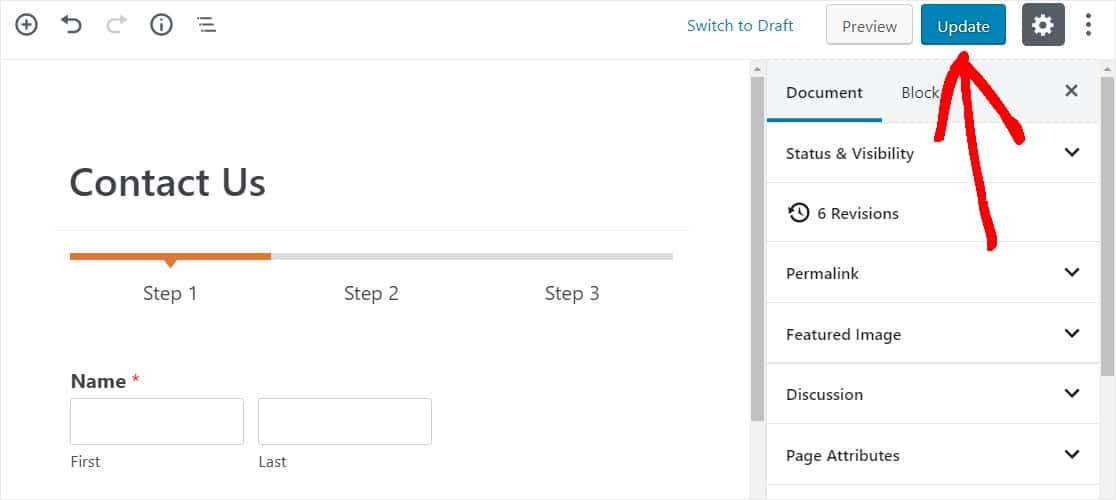
Next, click on the blue button in the top right that says either Publish or Update, so your form will appear on your website.
Next, Check Multi Step Form Examples
And there you have it! You now know how to create a multi step form in WordPress and you can start improving your user experience and conversion rate right away.
If you're looking for some multi-page form inspiration, check out this roundup of multi step form examples.
So, what are you waiting for? Get started with the best multi-step form builder for WordPress today.
And don't forget, if you like this article, then please follow us on Facebook and Twitter.
How To Create User Registration Form In Wordpress Without Plugin
Source: https://wpforms.com/how-to-create-a-multi-part-form-in-wordpress/
Posted by: blackcomentse.blogspot.com
0 Response to "How To Create User Registration Form In Wordpress Without Plugin"
Post a Comment